

How To Set Image Duration In Premiere Pro
24. Set Yet Image Elapsing
 BEFORE Y'all BEGIN
22 Set a Still for Video
29 About the Timeline and Video Layers
68 Well-nigh the Properties Panel
 SEE As well
14 Add Media with the Adobe Media Downloader
23 Scale and Position a Still
27 Change Slides to the Beat of Music
By default, any still image or graphic you add together to the Premiere Elements Timeline comes in with a duration of five seconds. (The exception is when you lot create a slideshow set to unnumbered timeline markers, as described in 27 Change Slides to the Beat of Music.) However, this default setting tin can be changed very easily.
| i. | Open Full general Preferences Click the More button in the Media console and select Still Epitome Elapsing. The Preferences dialog box opens to the General page. Among the General Preferences are options for setting stills to default to the video frame size when imported into your project (Run across 23 Scale and Position a Yet.) You tin can too admission the Preferences dialog box from the Edit drop-down carte du jour. The Preferences dialog box offers several pages of settings that can exist helpful in troubleshooting functional and hardware problems. |
| 2. | Change the Still Epitome Default Duration Time, in terms of elapsing in video, tin be gear up in seconds or in frames. In the NTSC organization, video has approximately 30 frames per second. The NTSC manufactory default of a v-second duration for stills is therefore listed as 150 frames. In the PAL system, video runs at 25 frames per second, and therefore 5 seconds is represented as 125 frames. In reality, NTSC video runs at 29.97 frames per second rather than xxx. However, because the drop-frame arrangement employed by Premiere Elements makes that fractional difference invisible, we can safely use the more manageable charge per unit of 30 frames per second for any calculations. Type the number of frames you'd like to exist the default for your however image elapsing. Click OK.24. Set Nonetheless Image Duration 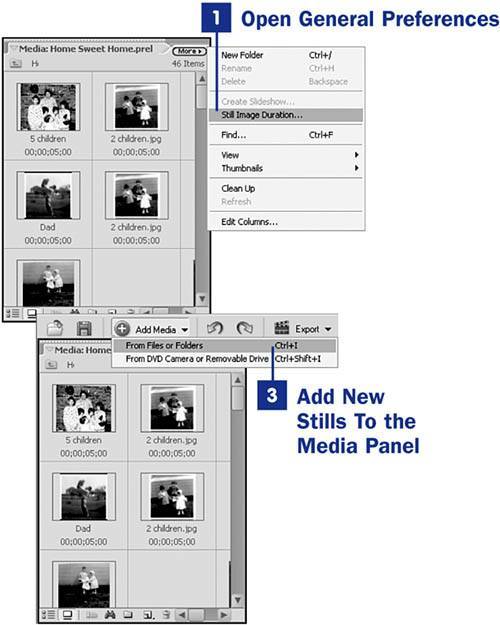 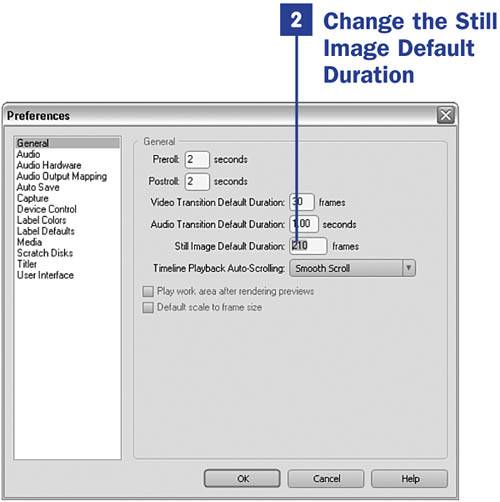 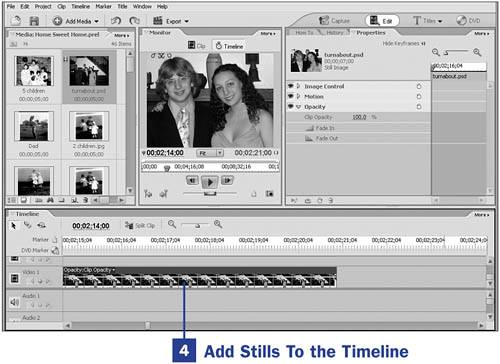 Changed default settings for still elapsing or withal size practise non touch on stills already in the Media console. Only stills added after the settings accept been inverse are affected past the changes. (Come across also 23 Scale and Position a Nonetheless.) |
| 3. | Add New Stills To the Media Console Click the Add together Media button, select From Files or Folders, and browse to select the pictures y'all desire to add to the Timeline at this new setting. (See also xiv Add together Media with the Adobe Media Downloader.) If you already have a photo in your Media panel with which you want to use the new default settings you simply established, you must re-import the prototype to the Media panel: Right-click the image in the Media console and select Articulate to remove it from the console. (This action does non erase the file from your hard bulldoze.) And so click the Add Media button, select From Files or Folders, and browse to add the prototype to your Media panel over again. The new default setting is practical to this nevertheless image. |
| iv. | Add Your Stills To the Timeline Elevate the still paradigm from the Media console to the location y'all want it to occupy in the Timeline. The yet has a default duration equal to the new setting. After you've place the withal on the Timeline, you can increase or subtract the clip's duration by dragging the ends of the clip out or in as described in 34 Trim a Clip on the Timeline. |
 Annotation
How To Set Image Duration In Premiere Pro,
Source: https://flylib.com/books/en/1.49.1.45/1/
Posted by: hernandezfornam.blogspot.com
0 Response to "How To Set Image Duration In Premiere Pro"
Post a Comment